How to Make a Rocketstove
:A Guide from Recipes for Disaster
In parts of Texas, a winter storm has knocked out electricity to millions of people. We saw via social media that some comrades were using a guide from our book, Recipes for Disaster, to make a rocketstove in order to boil water and cook food. We’ve scrambled to put that chapter online here in case anyone else needs it—in Texas today, or elsewhere in the climate disasters to come.
You can order Recipes for Disaster here.
Although a rocket stove can reduce the amount of carbon monoxide that a fire releases into the air, common sense about fires in enclosed spaces still applies. Make sure your space is ventilated! This particular design is most useful for cooking without gas or electricity.
https://twitter.com/MonkeyWrenchATX/status/1361883739219914752
How to Make a Rocketstove
This is an amazingly efficient way to extract the maximum amount of energy from limited stove fuel resources. In our final test before composing this, we made a large pot of old-style whole oat cereal boil for two hours with just a three-foot two-by-four that we yanked off a pallet.
Raw Materials
Five steel food cans:
- Two 15-ounce cans—the most common size of vegetable cans
- One 26-ounce can—this less common size is proportionately taller than regular cans; beans often come in cans this size
- Two one-gallon cans—these can be found in restaurant dumpsters, especially those of pizza restaurants
- Annealed tie wire—available at hardware stores by that name; this is made for tying rebar together in steel-reinforced concrete
- Insulation—You can use cob, a mixture of clay, sand, and straw, but ashes work better. If you don’t have enough, you can add perlite or vermiculite, which are both available at garden stores as soil additives.
- Can opener
- Pliers
- Drill with hole-saws (optional)
- Tin snips
-
Permanent marker

Instructions
Using the can opener, cut off the top and bottom of the two 15-ounce cans, making them into tubes; cut off the top of the 26-ounce can; cut off the top of one one-gallon can; cut off the top and bottom of the other one-gallon can. Save the top from one of the one-gallon cans.
Remove the labels, glue, and food residue from all cans.
Hold the bottom of the 26-ounce can to the side of one one-gallon can, about one inch from the bottom. Trace the circumference of the smaller can onto the side of the larger can so you will know what size hole to cut. Use your tin snips to cut the hole in the one-gallon can. You may want to cut the hole slightly small at first, then remove more if need be; you want these joints to be fairly tight.

Hold the 15-ounce can to the side of the 26-ounce can—all the way at the bottom this time—and trace it. Use tin snips to cut the hole in the 26-ounce can. Make sure the smaller can fits snugly in the larger can.
Make a two-inch cut lengthwise in one of the two 15-ounce cans. This will allow the can to squeeze and fit snugly in the end of the other. Now you have a steel tube about two cans long. This is your chimney.
Cover the bottom of the one-gallon can with insulation. The insulation should come up to the level of the bottom of the hole you have cut.
Put the 26-ounce can through the hole in the one-gallon can so that the hole you cut is in the center facing up. This is your firebox.
Squeeze the chimney cans into the hole in the 26-ounce can. Adjust the position of the cans so the chimney is in the center of the one-gallon can.
Make sure you haven’t shoved it so far into the 26-ounce can that it blocks too much airflow. You can also cut a bit of material away from the bottom of the chimney to further accommodate airflow when there is a fire.
Pack the remaining space between the inner cans and the one-gallon can with insulation. If you have used cob for insulation, it will take a while for this to dry and begin to insulate. You can speed this process by poking holes in the one-gallon can, leaving it in the sun, or running the stove. If you run the stove with wet insulation, you will get less heat to the pot and there will be less “draw”—the flames will not be as readily sucked up into the chimney where you want them. This should improve greatly as the cob dries.
Use the lid that you saved from the other one-gallon can to make a shelf for the firebox. The shelf should be a bit lower than the middle of the firebox. It should also be shorter than the firebox, so the space directly under the chimney is undivided. Fuel will go on top of this shelf; ash will fall down and collect underneath.
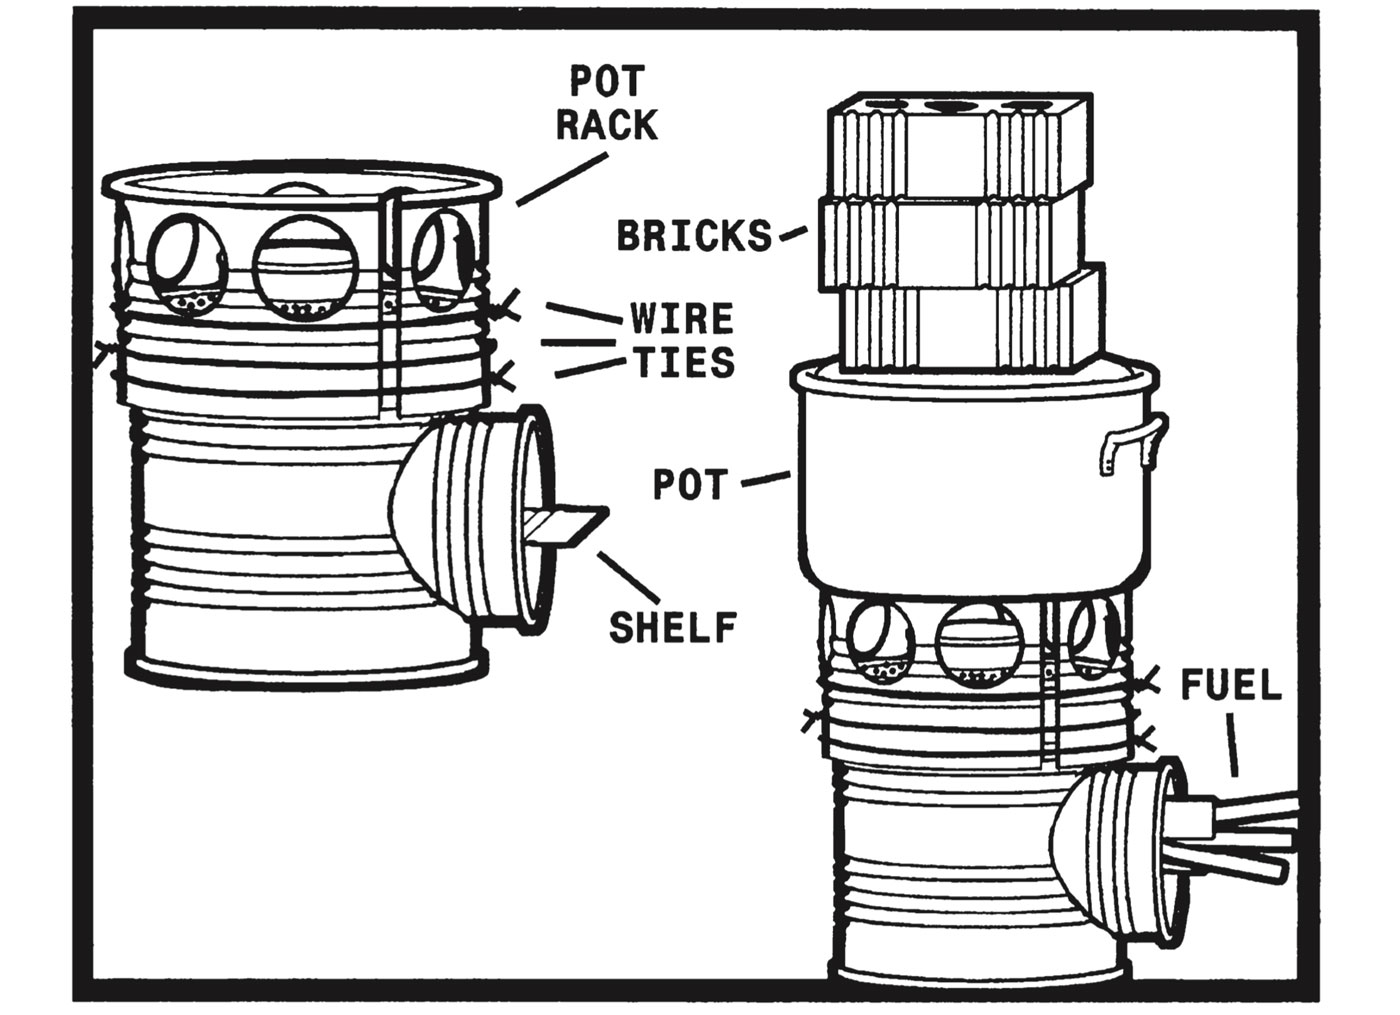
Your rocket stove is now complete, except for a pot rack. That is what the second one-gallon can is for. Cut a series of large holes along the top of this can so air can flow, but leave enough space between the holes that the can remains strong. Slice the can lengthwise so it can expand to fit over the other can, and slice a few inches off its bottom all the way around. Slide the sliced can over the other gallon can, so the former extends one or two inches above the latter; this is the rack on which your pot will sit. The chimney is your burner.
Wrap tie wire around the sliced can, and use pliers to twist it tightly so it is squeezed firmly around the other gallon can. You should tie at least three wires to hold the rack. Remember, the weight of your pot and food will rest on this rack.
To use the stove, place it on a level, steady surface that is high enough off the ground that you have easy access to the firebox. Use a hatchet to make small pieces of wood. Wood should be up to the diameter of a finger. Use paper and smaller wood kindling to start the fire. You can set and light the fire at the opening of the fire box, then shove it to the back under the chimney when it gets going. Be careful not to choke the stove—keep half or more of the volume of the firebox open to airflow.
When your fire is established, you can begin to cook. This is probably a two-person job: one to cook, the other to stoke. The stove burns the small pieces of wood very fast and requires constant attention. If your insulation is good and you are burning hot enough, the stove will produce very little ash. You shouldn’t have to empty it until the end of one cooking session.

Tips
To further increase efficiency, put a lid on your pot and pile bricks onto the lid—the more, the better. This creates a low-tech pressure cooker, decreasing cooking time.
You can use longer pieces of wood by letting the wood hang out of the firebox, advancing the pieces into the fire as they are consumed.